Real ear measurement is a short test that checks how much sound your hearing aids actually deliver at your eardrum, using a thin probe tube and a microphone. It is the only way to confirm that your hearing aids match a prescription built from your hearing test, and it often reveals that the manufacturer’s default settings fall short, especially in the high pitches that carry speech clarity.
What Real Ear Measurement Means
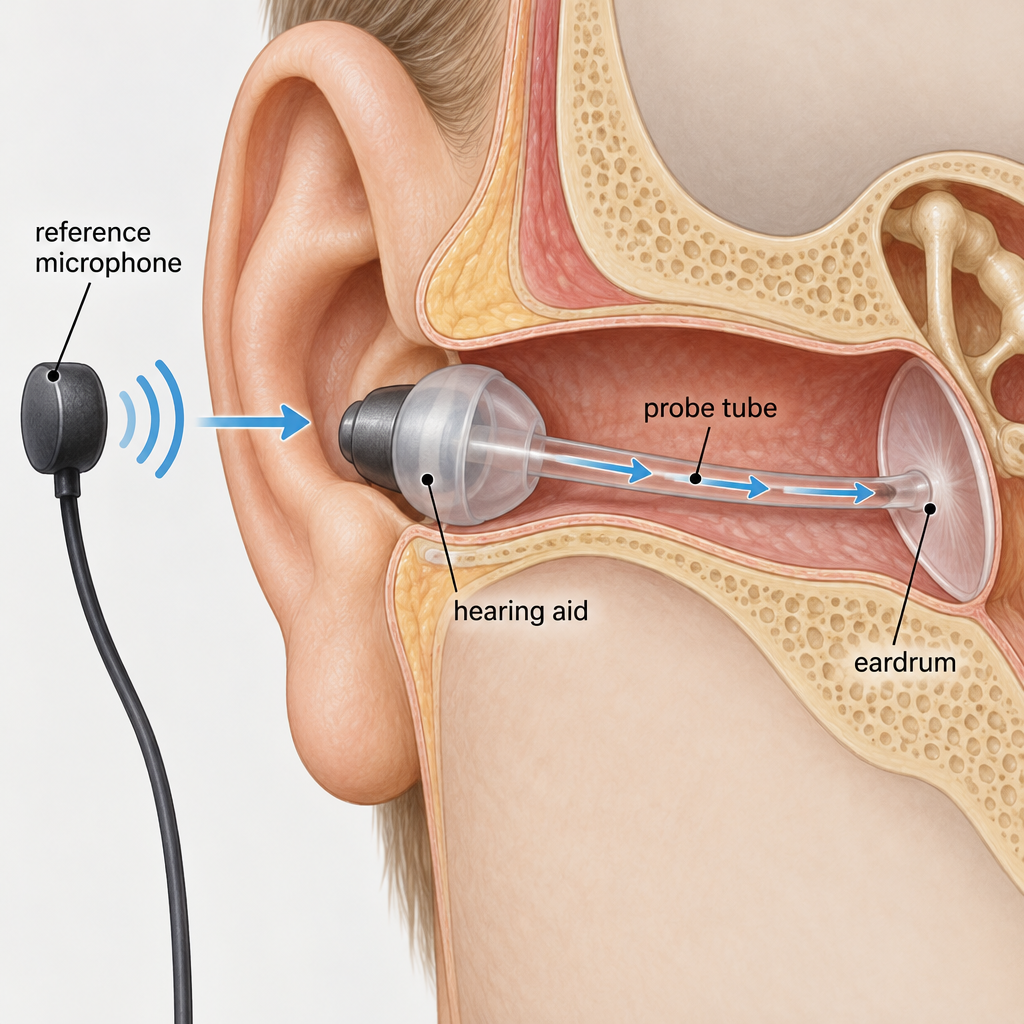
Real ear measurement (REM), also called probe-microphone measurement, records sound inside your own ear canal while your hearing aid is in place and working. A soft silicone tube, about as thin as a strand of cooked spaghetti, sits a few millimetres from your eardrum. It carries sound to a microphone that sits on a small headset or ear hook just outside your ear.
A speaker in front of you plays speech or a speech-like signal at set loudness levels. The equipment compares what reaches your eardrum with what your hearing loss calls for. Your audiologist then adjusts the hearing aid until the two line up.
The reason this matters is simple. Every ear canal has a different size and shape, and that changes how loud and how bright sound becomes by the time it reaches the eardrum. A hearing aid set to “50 dB of gain” in the fitting software can deliver noticeably more or less than that in your specific ear. REM measures the result instead of trusting an estimate.
What REM is not
It is not a hearing test. Your hearing test (the audiogram) measures what you can hear. REM measures what the hearing aid produces. You do not need to respond to any sounds or press any buttons. You just sit still and stay quiet.
It also does not diagnose anything. It verifies a device. If your hearing has changed suddenly or you have ear pain or drainage, that is a medical issue for a doctor, not a fitting issue.
See a professional
Sudden hearing loss in one or both ears is a medical emergency. See a doctor or go to urgent care within 24 to 48 hours, because treatment works best when started early.
The Terms You Will See on the Screen
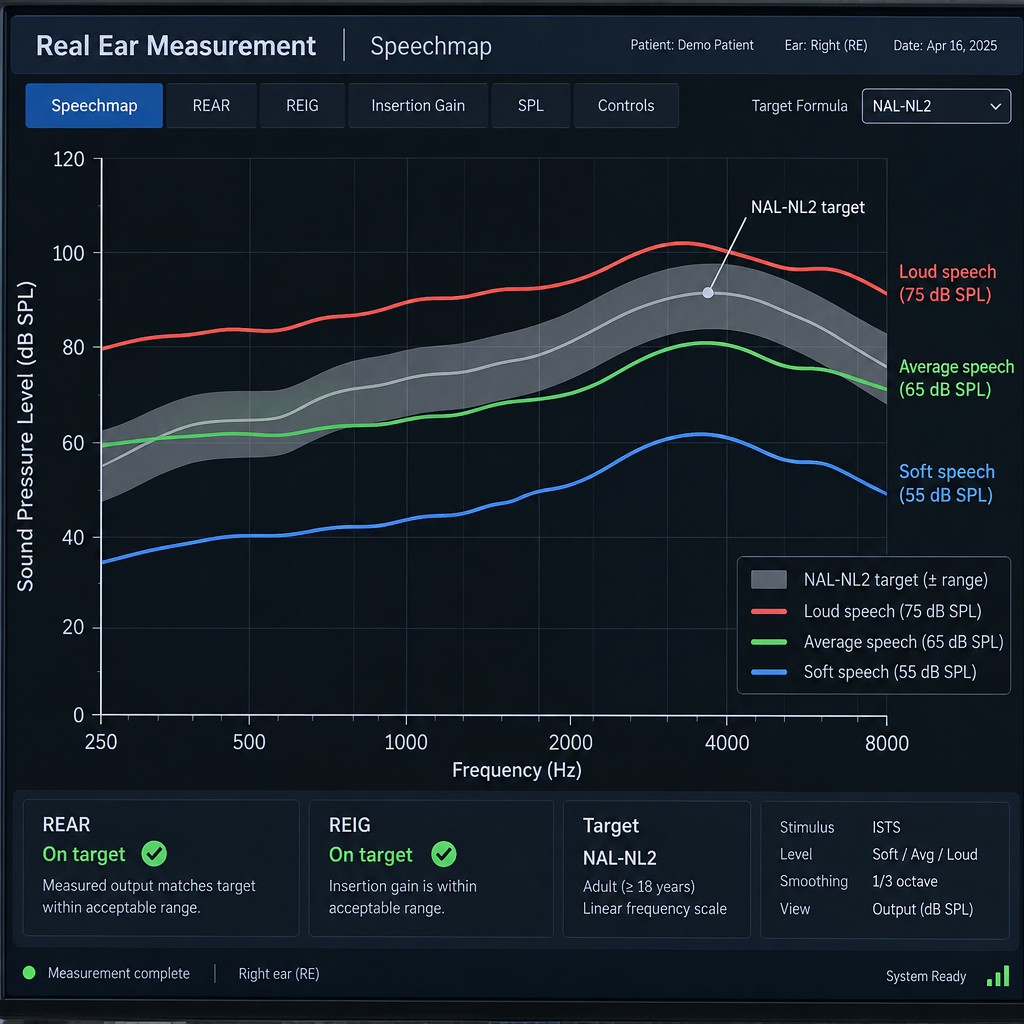
REM software throws a lot of acronyms at you. You do not need to memorise them, but knowing a few helps you understand what your audiologist is showing you. Most modern clinics display results as an “SPL-o-gram” or “speechmap,” which plots your hearing thresholds, your prescription targets and the aided sound on one graph.
| Term | Full name | What it shows |
|---|---|---|
| REUR / REUG | Real-ear unaided response / gain | How your open ear naturally boosts sound, with no hearing aid in |
| REOR | Real-ear occluded response | Sound at the eardrum with the hearing aid in but switched off or muted |
| REAR | Real-ear aided response | Sound at the eardrum with the hearing aid on, at a given input level |
| REIG | Real-ear insertion gain | The difference between aided and unaided responses (REAR minus REUR) |
| RESR / MPO | Real-ear saturation response / maximum power output | The loudest sound the hearing aid can produce in your ear |
| RECD | Real-ear-to-coupler difference | How your ear differs from a standard test cavity, used heavily with children |
| SII | Speech Intelligibility Index | An estimate (0 to 100) of how much speech information is audible |
The two most common ways to work are insertion gain (REIG) and aided response (REAR). Older protocols used insertion gain. Most current systems favour aided response shown as sound pressure level at the eardrum, because it sits neatly on the same graph as your hearing thresholds. Both are valid. What matters is that the fitting is checked against a target in your ear.
Why REM Is the Gold Standard for Fitting
Professional bodies in audiology have recommended probe-microphone verification for decades. The American Academy of Audiology and the American Speech-Language-Hearing Association both list it in their best-practice guidance for adult hearing aid fitting, and pediatric guidelines treat verification as essential. The British Society of Audiology publishes its own REM guidance for the same reason.
Prescriptions and targets
Your audiologist does not pick hearing aid settings by feel. Validated prescriptive formulas turn your audiogram into a target for how much sound you need at each pitch and loudness level. The two big ones are:
- NAL-NL2, from the National Acoustic Laboratories in Australia, widely used for adults. It aims to maximise speech intelligibility while keeping overall loudness comfortable.
- DSL v5, the Desired Sensation Level method developed at Western University in Canada, standard in pediatric fitting and also used for adults.
Each formula produces separate targets for soft, average and loud speech. Soft speech gets more boost than loud speech, because modern hearing aids use compression to squeeze the wide range of everyday sound into your narrower range of usable hearing.
The “first fit” problem
When a hearing aid is connected to the manufacturer’s software, it offers a “first fit” or “initial fit” setting. Many fittings stop there. The trouble is that first-fit settings are a prediction. They assume an average ear canal, an average fit of the dome or earmold, and in many cases a manufacturer’s own proprietary formula rather than NAL-NL2 or DSL.
Research has repeatedly found that first-fit settings miss prescriptive targets, usually by giving too little high-frequency sound. That is a real problem, because the consonants that make speech clear (s, f, th, sh, t, k) live mostly above 2,000 Hz. Miss the highs and people sound like they are mumbling, which is exactly the complaint that sent many people to the audiologist in the first place.
What the research shows
| Study | Journal | Key finding |
|---|---|---|
| Aazh and Moore, 2007 | Journal of the American Academy of Audiology | Only about 36% of hearing aids set with manufacturer first-fit came within 10 dB of NAL-NL1 targets across frequencies; after REM-based adjustment, most did |
| Abrams and colleagues, 2012 | Journal of the American Academy of Audiology | Adults fitted with REM verification reported better outcomes on a standard benefit questionnaire than with first-fit settings |
| Sanders and colleagues, 2015 | The Hearing Journal | Manufacturer first-fit settings tended to under-amplify high frequencies relative to NAL-NL2 targets |
| Valente and colleagues, 2018 | Journal of the American Academy of Audiology | Adults wore REM-verified NAL-NL2 and first-fit settings in a blinded trial; most preferred the verified fitting and reported better outcomes |
Taken together, these studies point the same way: a verified fitting is more likely to be audible, more likely to be accurate, and more likely to leave you satisfied. That is why REM is called the gold standard, and why skipping it puts the burden on you to notice something is wrong.
Why So Many Clinics Skip It
Despite the guidance, routine REM use has never been universal. Surveys going back more than a decade, including a widely cited 2010 survey published in The Hearing Journal, found that only somewhere between a third and two-fifths of hearing aid fitters used probe-microphone measures routinely. Awareness has grown since then, but plenty of people still get hearing aids without it.
The common reasons:
- Time. REM adds roughly 15 to 30 minutes to a fitting appointment. In a busy schedule that feels expensive.
- Equipment cost. Dedicated systems from makers such as Audioscan, Interacoustics, Natus Otometrics and MedRx represent a significant investment for a small practice.
- Training and confidence. Placing a probe tube well and interpreting the graph takes practice. Clinicians who did not learn it thoroughly may avoid it.
- Trust in the software. Some fitters assume modern “in-situ” or “feedback calibration” routines in the manufacturer software do the same job. They do not. Those routines estimate the acoustic properties of your ear and tubing; they do not measure the result against a validated target.
- Patients don’t ask. Most people have never heard of REM, so there is no pressure to provide it.
None of these reasons benefits you. Time and equipment are business costs. If a clinic chooses not to verify, you are effectively the test instrument, reporting back over weeks of follow-ups whether things sound “okay.”
Hearing tip
When you book a hearing aid fitting, ask on the phone: “Do you use real ear measurement to verify every fitting?” A clinic that does will say yes without hesitation.
What You Need Before the Test
REM needs very little from you, but a few things make it faster and more accurate. Here is what should be in place.
Prerequisites:
- A recent, accurate audiogram. Ideally from within the last year, including air and bone conduction thresholds. The prescription targets are only as good as the hearing test.
- Clear ear canals. Earwax can block the probe tube or change the reading. Your audiologist will look in your ears first. If you know you build up wax, have it cleared a week or so before the fitting rather than on the day.
- Your hearing aids, programmed and fitted physically. The domes or earmolds need to be the size and style you will actually wear, because the vent and seal change the low-frequency response a lot.
- A quiet room and a calibrated system. The clinic’s job, but worth knowing: REM equipment needs regular calibration and a reasonably quiet space.
- Twenty to thirty minutes of sitting still. You will need to face a speaker, stay quiet and avoid moving your jaw much while measurements run.
If you wear glasses, keep them on unless asked otherwise. If you have a medical condition affecting your ear canal (recent surgery, an active infection, a perforated eardrum), tell your audiologist before anything goes into your ear.
How a Real Ear Measurement Works, Step by Step
Protocols vary slightly between clinics and equipment, but a typical adult fitting follows this order.
Real ear measurement steps
- Look in both ears with an otoscope to check for wax and canal health.
- Enter or import your audiogram so the system calculates prescription targets.
- Calibrate the probe tube against the reference microphone.
- Insert the probe tube to the correct depth, near the eardrum.
- Optionally measure your open ear (unaided response).
- Insert the hearing aid beside the tube and measure aided responses at soft, average and loud levels.
- Adjust the hearing aid until it matches targets, then check maximum output.
Step 1: Otoscopy
Your audiologist looks into each ear with a lit otoscope. They are checking that the canal is clear and healthy, and getting a sense of its shape and bends so they can place the probe tube safely. If there is significant wax, it needs to come out first, because a tube pressed against wax will give a muffled, inaccurate reading.
Step 2: Load the audiogram and choose a prescription
Your hearing thresholds go into the REM system, usually imported directly from the clinic’s database (often through Noah, the industry-standard software platform). The audiologist picks a prescription, most commonly NAL-NL2 for adults or DSL v5 for children, and sets details such as whether you are a new or experienced user, which affects how much gain you start with.
Step 3: Calibrate the probe tube
The tube itself slightly changes the sound passing through it. To correct for that, the audiologist holds the tube tip next to the reference microphone and runs a quick calibration. It takes a few seconds. Skipping it is one of the easier ways to get a misleading result.
Step 4: Place the probe tube
This is the step that takes skill. The tube needs to sit within about 5 mm of the eardrum, close enough to capture high-frequency sound accurately but not touching the eardrum.
Many audiologists use a rule of thumb: measure along the tube from the tip and mark it so that it extends roughly 28 mm (for many women) to 30 mm (for many men) past the intertragal notch, the little dip at the bottom of the opening of your ear. Others use otoscopy to watch the tube tip move into position, or play a tone and watch for a characteristic dip in the response to judge depth.
You may feel a light tickle or hear a faint scratching sound. It should not hurt. If it does, say so immediately and the tube will be repositioned.
Step 5: Measure the open ear (optional)
Some protocols start by measuring your open, unaided ear. Your outer ear and canal naturally boost sound around 2,500 to 3,000 Hz by roughly 15 to 20 dB. This open-ear resonance matters because putting a hearing aid in partly blocks it, and the hearing aid has to make up for what it takes away. Insertion-gain protocols need this measurement. Aided-response protocols can skip it.
Step 6: Measure aided response at three levels
The hearing aid goes in, carefully placed beside the probe tube so the tube does not move. The speaker plays a calibrated speech signal, often the International Speech Test Signal (ISTS), a standardised recording built from several languages so that it sounds like speech without being understandable. Some clinics also use real recorded speech or live voice.
The signal plays at three levels, each producing a curve on the screen:
| Input level | Represents | What the audiologist checks |
|---|---|---|
| About 50 to 55 dB SPL | Soft speech, a quiet voice across the room | Is soft speech audible above your thresholds? |
| About 65 dB SPL | Average conversational speech | Does the curve match the target closely, especially 1,000 to 4,000 Hz? |
| About 75 to 80 dB SPL | Loud speech, a raised voice | Is loud speech comfortable and on target, not overamplified? |
| 85 to 90 dB SPL pure-tone sweep | Very loud sounds | Maximum output stays below your discomfort level |
Step 7: Adjust and recheck
Now the audiologist adjusts gain, compression and output in the fitting software, rerunning measurements until the aided curves sit on or near the targets. This is where REM earns its keep. Without it, adjustments are guesses. With it, every change is visible immediately.
The final check is maximum power output. A loud sweep tone confirms that the hearing aid never pushes sound above a level that would be uncomfortable or potentially harmful to you. Once both ears are done, many audiologists save the curves to your file so future adjustments can be compared against them.
Reading the Results: What a Good Match Looks Like
The expected result is a set of aided curves that track the prescription targets closely across the speech frequencies, with soft speech audible and loud sounds kept comfortable.
Common tolerances
A widely used clinical tolerance, reflected in British Society of Audiology guidance, is:
- Within ±5 dB of target from 250 to 2,000 Hz
- Within ±8 dB of target at 3,000 and 4,000 Hz
Above 4,000 Hz, matching gets harder, both because hearing aids run out of power there and because the measurement itself gets less precise. Many fittings will fall below target at 6,000 Hz and beyond, and that can be acceptable if your hearing in that range is very poor.
When “close enough” is the right answer
Targets are a starting point, not a commandment. Experienced audiologists sometimes deliberately set gain a few decibels under target for a brand-new user who finds full amplification overwhelming, with a plan to step up over several weeks. Some manufacturers build this “acclimatisation” into the software automatically.
The difference is that with REM, the deviation is a choice you can see and track. Without it, nobody knows how far off the fitting is or in which direction.
What the Speech Intelligibility Index tells you
Many systems also show an aided SII, a score estimating how much of the speech signal is audible. If your unaided SII at average conversation is 35 and your aided SII is 70, the hearing aids are making a large share of speech audible that was missing before. A high SII is not the same as understanding speech perfectly, because your brain’s ability to process sound also matters, but it is a useful check that the basics are in place.
Common Mistakes and Troubleshooting
REM is reliable when done properly, but certain errors crop up often. Knowing them helps you judge whether your test was done carefully.
| Problem | What causes it | How it shows up | Fix |
|---|---|---|---|
| Probe tube too shallow | Tube not inserted far enough | False dip in the high frequencies, often around 4,000 to 6,000 Hz | Reinsert deeper, toward the eardrum |
| Tube pinched or blocked | Wax, or the hearing aid pressing on the tube | Very low or erratic readings | Clean canal, re-route tube, recalibrate |
| Tube moved when aid inserted | Hearing aid pushes the tube in or out | Aided curves look inconsistent with unaided | Mark the tube depth and check it after insertion |
| Skipped calibration | Probe tube not calibrated | Systematic error across frequencies | Recalibrate before measuring |
| Feedback (whistling) during test | Gain set high with an open dome | Spike or ripple in the curve, audible squeal | Run feedback management, change dome, reduce gain slightly |
| Patient talking or moving | Natural restlessness | Jumpy, noisy curves | Re-run the measurement in silence |
| Speaker in wrong position | Patient turned away or too far | Unexpected level differences between ears | Reposition at the standard distance and angle |
| Noise reduction or features active | Adaptive features reacting to test signal | Gain drops partway through | Use a speech-like signal or temporarily disable for verification |
Open fittings and venting
With open domes, low-frequency sound passes straight through the vent, and low-frequency amplification leaks back out. It is normal for open fittings to fall below target below about 750 Hz. That is a physical limit, not a mistake, and many people with good low-frequency hearing do not need much boost there anyway. If you have significant low-frequency loss and the curve is far below target, a closed dome or custom earmold is often the fix.
Feedback limits high-frequency gain
Feedback management systems in modern hearing aids sometimes reduce high-frequency gain to stop whistling. REM makes this visible: you will see the high-frequency curve stuck below target even after the audiologist raises gain in the software. Solutions include a tighter dome, a different receiver, a custom mold or changing the feedback manager’s settings.
Going Beyond the Basic Fit: Verifying Features
Matching targets for speech is the core of REM. Good clinics also use it to check that the features you are paying for actually work in your ear.
Maximum power output
Already covered in the steps, but worth repeating. Output that is too high risks discomfort and further damage. Output that is too low makes loud speech sound flat and squashed. REM is the only way to confirm the setting in your own canal.
Frequency lowering
Many hearing aids can move high-pitched sounds into a lower range you can still hear. Brands use different names: Phonak calls it SoundRecover2, Oticon uses Speech Rescue, Signia offers Frequency Compression and ReSound has Sound Shaper. Some REM systems include test signals designed for this, such as filtered speech bands centred on the “s” and “sh” sounds. The audiologist can confirm that those sounds land in an audible region, and that the setting is strong enough to help without making speech sound distorted.
Directional microphones
Directional processing focuses on sound from in front of you and turns down sound from behind. Some systems can test this by playing a signal from the front and then from the side or back, showing how much the hearing aid reduces the rear sound. It is a useful check that the microphones are clean and the program is set up correctly.
Noise reduction
Digital noise reduction is harder to verify with a single measurement, because it reacts to signal type over time. Some systems play speech with steady background noise and show how gain changes. At minimum, REM confirms that noise reduction is not secretly cutting speech gain below target.
Bluetooth and streaming
Streamed audio from phones and TVs goes straight into the hearing aid and bypasses the microphones, so it is not measured by standard REM. Streaming volume and tone are adjusted separately in the fitting software or in the manufacturer’s app. If streamed calls sound thin or quiet, mention it at your follow-up.
REM for Children
Verification matters even more for children, who cannot always say whether speech sounds clear and who need full access to speech to develop language. Pediatric fittings commonly use the DSL v5 prescription.
Because children’s ear canals are smaller, the same hearing aid produces more sound at a child’s eardrum than at an adult’s. Their canals also change as they grow. That is why the real-ear-to-coupler difference (RECD) is so useful. The audiologist measures, once, how the child’s ear differs from a standard test cavity called a coupler. After that, much of the fine-tuning can happen in a test box using that correction, with the hearing aid connected to the coupler instead of the child’s ear. That makes it practical for babies and toddlers who will not sit still for 20 minutes.
The RECD needs to be remeasured as the child grows and whenever earmolds are replaced, which happens often in the first years of life.
OTC Hearing Aids and Real Ear Measurement
Since the FDA’s over-the-counter hearing aid rule took effect on October 17, 2022, adults with perceived mild to moderate hearing loss can buy hearing aids without seeing a professional. OTC devices are designed to be fitted by the user, typically with an in-app hearing check or a set of presets.
That convenience comes with a trade-off: OTC self-fitting does not include probe-microphone verification. The app estimates your needs and sets the device, but nobody measures what actually reaches your eardrum.
| Factor | OTC hearing aids | Prescription hearing aids |
|---|---|---|
| Who can buy | Adults 18+ with perceived mild to moderate loss | Anyone, through a licensed professional |
| How settings are chosen | Self-fitting app or presets | Professional fitting from your audiogram |
| REM verification | Not included | Recommended best practice; ask for it |
| FDA output limit | 111 dB SPL, or 117 dB SPL with input-controlled compression and user volume control | Set by professional for your hearing |
| Suits | Mild to moderate loss, no red-flag symptoms | All degrees of loss, including severe and complex cases |
Some audiologists will verify OTC devices with REM for a fee, though how much you can adjust depends on whether the device lets a professional reach its settings. If you have bought OTC hearing aids and speech still sounds unclear after a few weeks of daily wear, a professional evaluation is the sensible next step. It may show that your loss is more significant than the OTC category is designed for.
See a professional
Skip OTC devices and see a doctor or audiologist if you have hearing loss in only one ear, ear pain, drainage, dizziness, or a sudden or rapidly worsening change.
Questions to Ask Your Audiologist
You have every right to understand how your hearing aids are being fitted. These questions help you gauge the quality of care without sounding confrontational.
- “Do you verify every fitting with real ear measurement?” The answer should be yes, routinely, not “only if there’s a problem.”
- “Which prescription are you fitting to?” You want a recognised formula such as NAL-NL2 or DSL v5, not only the manufacturer’s proprietary target.
- “Can you show me my results on the screen?” A good audiologist will happily walk you through where your thresholds, targets and aided curves sit.
- “How close are we to target, and where are we deliberately below it?” This tells you whether gaps are a plan or a limitation.
- “Did you check maximum output?” It confirms that loud sounds are kept at a safe, comfortable level.
- “Will you re-run REM if we make big changes later?” Major adjustments, a new dome or a new earmold all change the acoustics and justify remeasuring.
- “Is REM included in the fitting price?” In bundled pricing it usually is. In unbundled clinics it may be listed separately, so ask before you commit.
If a clinic says the manufacturer software “already accounts for your ear,” that is a sign they are relying on the first fit. You can politely ask for verification or look for another provider.
What to Expect After a Verified Fitting
A well-verified fitting usually sounds brighter and sharper on day one than you expect. Paper rustles. Your own voice sounds different. The fridge hums. The clinking of cutlery seems absurdly loud. That is normal: your brain has been missing those sounds, sometimes for years, and needs a few weeks of consistent daily wear to settle.
What you should notice over the first few weeks is easier conversation in quiet rooms, fewer requests for people to repeat themselves and less effort following speech on TV. Noisy restaurants will still be harder than quiet ones, because no hearing aid fully separates speech from competing voices.
Plan for at least one follow-up visit about two to four weeks after the fitting. Bring notes on specific situations: “my grandson’s voice is still hard to catch,” “the car is too loud,” “my own voice sounds boomy.” Those details guide fine-tuning far better than “it’s mostly fine.”
Hearing aids are one tool among several
Even a perfectly verified fitting does not solve every listening situation. Phone calls can remain difficult, especially with background noise. Many people combine hearing aids with captions on TV and streaming services (closed captioning has improved a lot on most platforms), captioned phone apps, or a telecommunications relay service for calls where clarity matters. Using those tools alongside your hearing aids is smart practice, not a sign the fitting failed.
When to come back for re-verification
Ask for REM again if:
- Your hearing test shows a meaningful change
- You switch dome size or style, or get a new earmold
- You get new hearing aids, even the same model
- Something sounds noticeably different and adjustments in the app have not helped
FAQ
Is real ear measurement accurate?
Yes, when it is done properly. With the probe tube tip within about 5 mm of the eardrum, measurements are typically accurate to within a couple of decibels up to about 6,000 Hz. Most errors come from poor tube placement, skipped calibration, wax or movement during testing, all of which a careful clinician controls. It is far more accurate than relying on manufacturer first-fit predictions.
What does real ear measurement mean?
It means measuring sound inside your own ear canal while you wear a hearing aid, using a thin probe tube connected to a microphone. The results show exactly how much sound reaches your eardrum at different pitches and loudness levels, so your audiologist can adjust the hearing aid to match a prescription built from your hearing test.
How long does a real ear measurement take?
Usually about 15 to 30 minutes for both ears, including probe placement, measurements at several loudness levels and adjustments. It can take longer for complex fittings, feature checks such as frequency lowering, or young children. It is normally done during your hearing aid fitting appointment, not as a separate visit.
How many inches deep is your ear?
An adult ear canal is roughly 2.5 cm long, just under an inch, from the opening to the eardrum, with an S-shaped curve and two bends. During REM, the probe tube typically extends about 28 to 30 mm (around 1.1 to 1.2 inches) past the notch at the bottom of the ear opening, which places the tip close to the eardrum without touching it. Children’s canals are shorter. Never insert anything into your own ear canal to check its depth.
Does real ear measurement hurt?
No. Most people feel a slight tickle or hear a soft scratching as the tube goes in. If you feel any pain, tell your audiologist straight away so they can reposition it.
Can I ask for REM if my clinic doesn’t offer it?
You can ask, but a clinic without the equipment cannot provide it. If verification matters to you, and the evidence says it should, look for an audiologist or hearing aid specialist who uses REM routinely and is willing to show you the results.
Last updated: October 29, 2026. This article provides general information about hearing aid fitting and is not a substitute for advice from an audiologist or doctor.